通知
介绍
除了支持发送电子邮件外,Laravel 还支持通过多种发送渠道发送通知,包括电子邮件、SMS(通过 Vonage,以前称为 Nexmo)和 Slack。此外,已经创建了多种社区构建的通知渠道,可以通过数十种不同的渠道发送通知!通知还可以存储在数据库中,以便在您的 Web 界面中显示。
通常,通知应该是简短的信息性消息,通知用户应用程序中发生的事情。例如,如果您正在编写一个计费应用程序,您可能会通过电子邮件和 SMS 渠道向用户发送“发票已支付”通知。
生成通知
在 Laravel 中,每个通知由一个单独的类表示,通常存储在 app/Notifications 目录中。如果您在应用程序中没有看到此目录,请不要担心 - 当您运行 make:notification Artisan 命令时,它将为您创建:
php artisan make:notification InvoicePaid此命令将在您的 app/Notifications 目录中放置一个新的通知类。每个通知类都包含一个 via 方法和可变数量的消息构建方法,例如 toMail 或 toDatabase,这些方法将通知转换为针对特定渠道的消息。
发送通知
使用 Notifiable Trait
通知可以通过两种方式发送:使用 Notifiable trait 的 notify 方法或使用 Notification facade。Notifiable trait 默认包含在应用程序的 App\Models\User 模型中:
<?php

namespace App\Models;

use Illuminate\Foundation\Auth\User as Authenticatable;
use Illuminate\Notifications\Notifiable;

class User extends Authenticatable
{
    use Notifiable;
}notify 方法由此 trait 提供,期望接收一个通知实例:
use App\Notifications\InvoicePaid;

$user->notify(new InvoicePaid($invoice));NOTE
请记住,您可以在任何模型上使用 Notifiable trait。您不仅限于将其包含在 User 模型中。
使用 Notification Facade
或者,您可以通过 Notification facade 发送通知。当您需要向多个可通知实体(如用户集合)发送通知时,此方法非常有用。要使用 facade 发送通知,请将所有可通知实体和通知实例传递给 send 方法:
use Illuminate\Support\Facades\Notification;

Notification::send($users, new InvoicePaid($invoice));您还可以使用 sendNow 方法立即发送通知。即使通知实现了 ShouldQueue 接口,此方法也会立即发送通知:
Notification::sendNow($developers, new DeploymentCompleted($deployment));指定发送渠道
每个通知类都有一个 via 方法,用于确定通知将在哪些渠道上发送。通知可以通过 mail、database、broadcast、vonage 和 slack 渠道发送。
NOTE
如果您想使用其他发送渠道,如 Telegram 或 Pusher,请查看社区驱动的 Laravel Notification Channels 网站。
via 方法接收一个 $notifiable 实例,该实例将是发送通知的类的实例。您可以使用 $notifiable 来确定通知应在哪些渠道上发送:
/**
 * 获取通知的发送渠道。
 *
 * @param  mixed  $notifiable
 * @return array
 */
public function via($notifiable)
{
    return $notifiable->prefers_sms ? ['vonage'] : ['mail', 'database'];
}队列通知
WARNING
在队列通知之前,您应该配置队列并启动工作程序。
发送通知可能需要时间,尤其是当渠道需要进行外部 API 调用以发送通知时。为了加快应用程序的响应时间,可以通过在类中添加 ShouldQueue 接口和 Queueable trait 来让通知排队。接口和 trait 已经为使用 make:notification 命令生成的所有通知导入,因此您可以立即将它们添加到通知类中:
<?php

namespace App\Notifications;

use Illuminate\Bus\Queueable;
use Illuminate\Contracts\Queue\ShouldQueue;
use Illuminate\Notifications\Notification;

class InvoicePaid extends Notification implements ShouldQueue
{
    use Queueable;

    // ...
}一旦将 ShouldQueue 接口添加到通知中,您可以像往常一样发送通知。Laravel 将检测类上的 ShouldQueue 接口,并自动将通知的发送排队:
$user->notify(new InvoicePaid($invoice));在队列通知时,将为每个接收者和渠道组合创建一个队列作业。例如,如果您的通知有三个接收者和两个渠道,将有六个作业被派发到队列中。
延迟通知
如果您想延迟通知的发送,可以在通知实例化时链接 delay 方法:
$delay = now()->addMinutes(10);

$user->notify((new InvoicePaid($invoice))->delay($delay));按渠道延迟通知
您可以将一个数组传递给 delay 方法,以指定特定渠道的延迟时间:
$user->notify((new InvoicePaid($invoice))->delay([
    'mail' => now()->addMinutes(5),
    'sms' => now()->addMinutes(10),
]));或者,您可以在通知类本身上定义一个 withDelay 方法。withDelay 方法应返回一个包含渠道名称和延迟值的数组:
/**
 * 确定通知的发送延迟。
 *
 * @param  mixed  $notifiable
 * @return array
 */
public function withDelay($notifiable)
{
    return [
        'mail' => now()->addMinutes(5),
        'sms' => now()->addMinutes(10),
    ];
}自定义通知队列连接
默认情况下,队列通知将使用应用程序的默认队列连接进行排队。如果您想为特定通知指定一个不同的连接,可以在通知类上定义一个 $connection 属性:
/**
 * 队列通知时要使用的队列连接名称。
 *
 * @var string
 */
public $connection = 'redis';或者,如果您想为通知支持的每个渠道指定一个特定的队列连接,可以在通知上定义一个 viaConnections 方法。此方法应返回一个包含渠道名称和队列连接名称对的数组:
/**
 * 确定每个通知渠道应使用的连接。
 *
 * @return array
 */
public function viaConnections()
{
    return [
        'mail' => 'redis',
        'database' => 'sync',
    ];
}自定义通知渠道队列
如果您想为通知支持的每个渠道指定一个特定的队列,可以在通知上定义一个 viaQueues 方法。此方法应返回一个包含渠道名称和队列名称对的数组:
/**
 * 确定每个通知渠道应使用的队列。
 *
 * @return array
 */
public function viaQueues()
{
    return [
        'mail' => 'mail-queue',
        'slack' => 'slack-queue',
    ];
}队列通知与数据库事务
当队列通知在数据库事务中被派发时,它们可能会在数据库事务提交之前被队列处理。当这种情况发生时,您在数据库事务中对模型或数据库记录所做的任何更新可能尚未反映在数据库中。此外,在事务中创建的任何模型或数据库记录可能不存在于数据库中。如果您的通知依赖于这些模型,当发送队列通知的作业被处理时,可能会发生意外错误。
如果您的队列连接的 after_commit 配置选项设置为 false,您仍然可以通过在发送通知时调用 afterCommit 方法来指示特定的队列通知在所有打开的数据库事务提交后被派发:
use App\Notifications\InvoicePaid;

$user->notify((new InvoicePaid($invoice))->afterCommit());或者,您可以从通知的构造函数中调用 afterCommit 方法:
<?php

namespace App\Notifications;

use Illuminate\Bus\Queueable;
use Illuminate\Contracts\Queue\ShouldQueue;
use Illuminate\Notifications\Notification;

class InvoicePaid extends Notification implements ShouldQueue
{
    use Queueable;

    /**
     * 创建一个新的通知实例。
     *
     * @return void
     */
    public function __construct()
    {
        $this->afterCommit();
    }
}NOTE
要了解更多关于解决这些问题的信息,请查看有关队列作业和数据库事务的文档。
确定队列通知是否应发送
在队列通知被派发到队列进行后台处理后,通常会被队列工作程序接受并发送给其预期的接收者。
然而,如果您想在队列工作程序处理后最终确定队列通知是否应发送,可以在通知类上定义一个 shouldSend 方法。如果此方法返回 false,则不会发送通知:
/**
 * 确定是否应发送通知。
 *
 * @param  mixed  $notifiable
 * @param  string  $channel
 * @return bool
 */
public function shouldSend($notifiable, $channel)
{
    return $this->invoice->isPaid();
}按需通知
有时您可能需要向不是应用程序“用户”的人发送通知。使用 Notification facade 的 route 方法,您可以在发送通知之前指定临时的通知路由信息:
use Illuminate\Broadcasting\Channel;
use Illuminate\Support\Facades\Notification;

Notification::route('mail', 'taylor@example.com')
            ->route('vonage', '5555555555')
            ->route('slack', 'https://hooks.slack.com/services/...')
            ->route('broadcast', [new Channel('channel-name')])
->notify(new InvoicePaid($invoice));如果您想在向 mail 路由发送按需通知时提供收件人的姓名,可以提供一个数组,其中包含电子邮件地址作为键,姓名作为数组第一个元素的值:
Notification::route('mail', [
    'barrett@example.com' => 'Barrett Blair',
])->notify(new InvoicePaid($invoice));邮件通知
格式化邮件消息
如果通知支持以电子邮件形式发送,您应该在通知类上定义一个 toMail 方法。此方法将接收一个 $notifiable 实体,并应返回一个 Illuminate\Notifications\Messages\MailMessage 实例。
MailMessage 类包含一些简单的方法来帮助您构建事务性电子邮件消息。邮件消息可以包含文本行以及“行动呼吁”。让我们来看一个 toMail 方法的示例:
/**
 * 获取通知的邮件表示。
 *
 * @param  mixed  $notifiable
 * @return \Illuminate\Notifications\Messages\MailMessage
 */
public function toMail($notifiable)
{
    $url = url('/invoice/'.$this->invoice->id);

    return (new MailMessage)
                ->greeting('Hello!')
                ->line('One of your invoices has been paid!')
                ->lineIf($this->amount > 0, "Amount paid: {$this->amount}")
                ->action('View Invoice', $url)
                ->line('Thank you for using our application!');
}NOTE
请Note,我们在 toMail 方法中使用了 $this->invoice->id。您可以将通知生成消息所需的任何数据传递到通知的构造函数中。
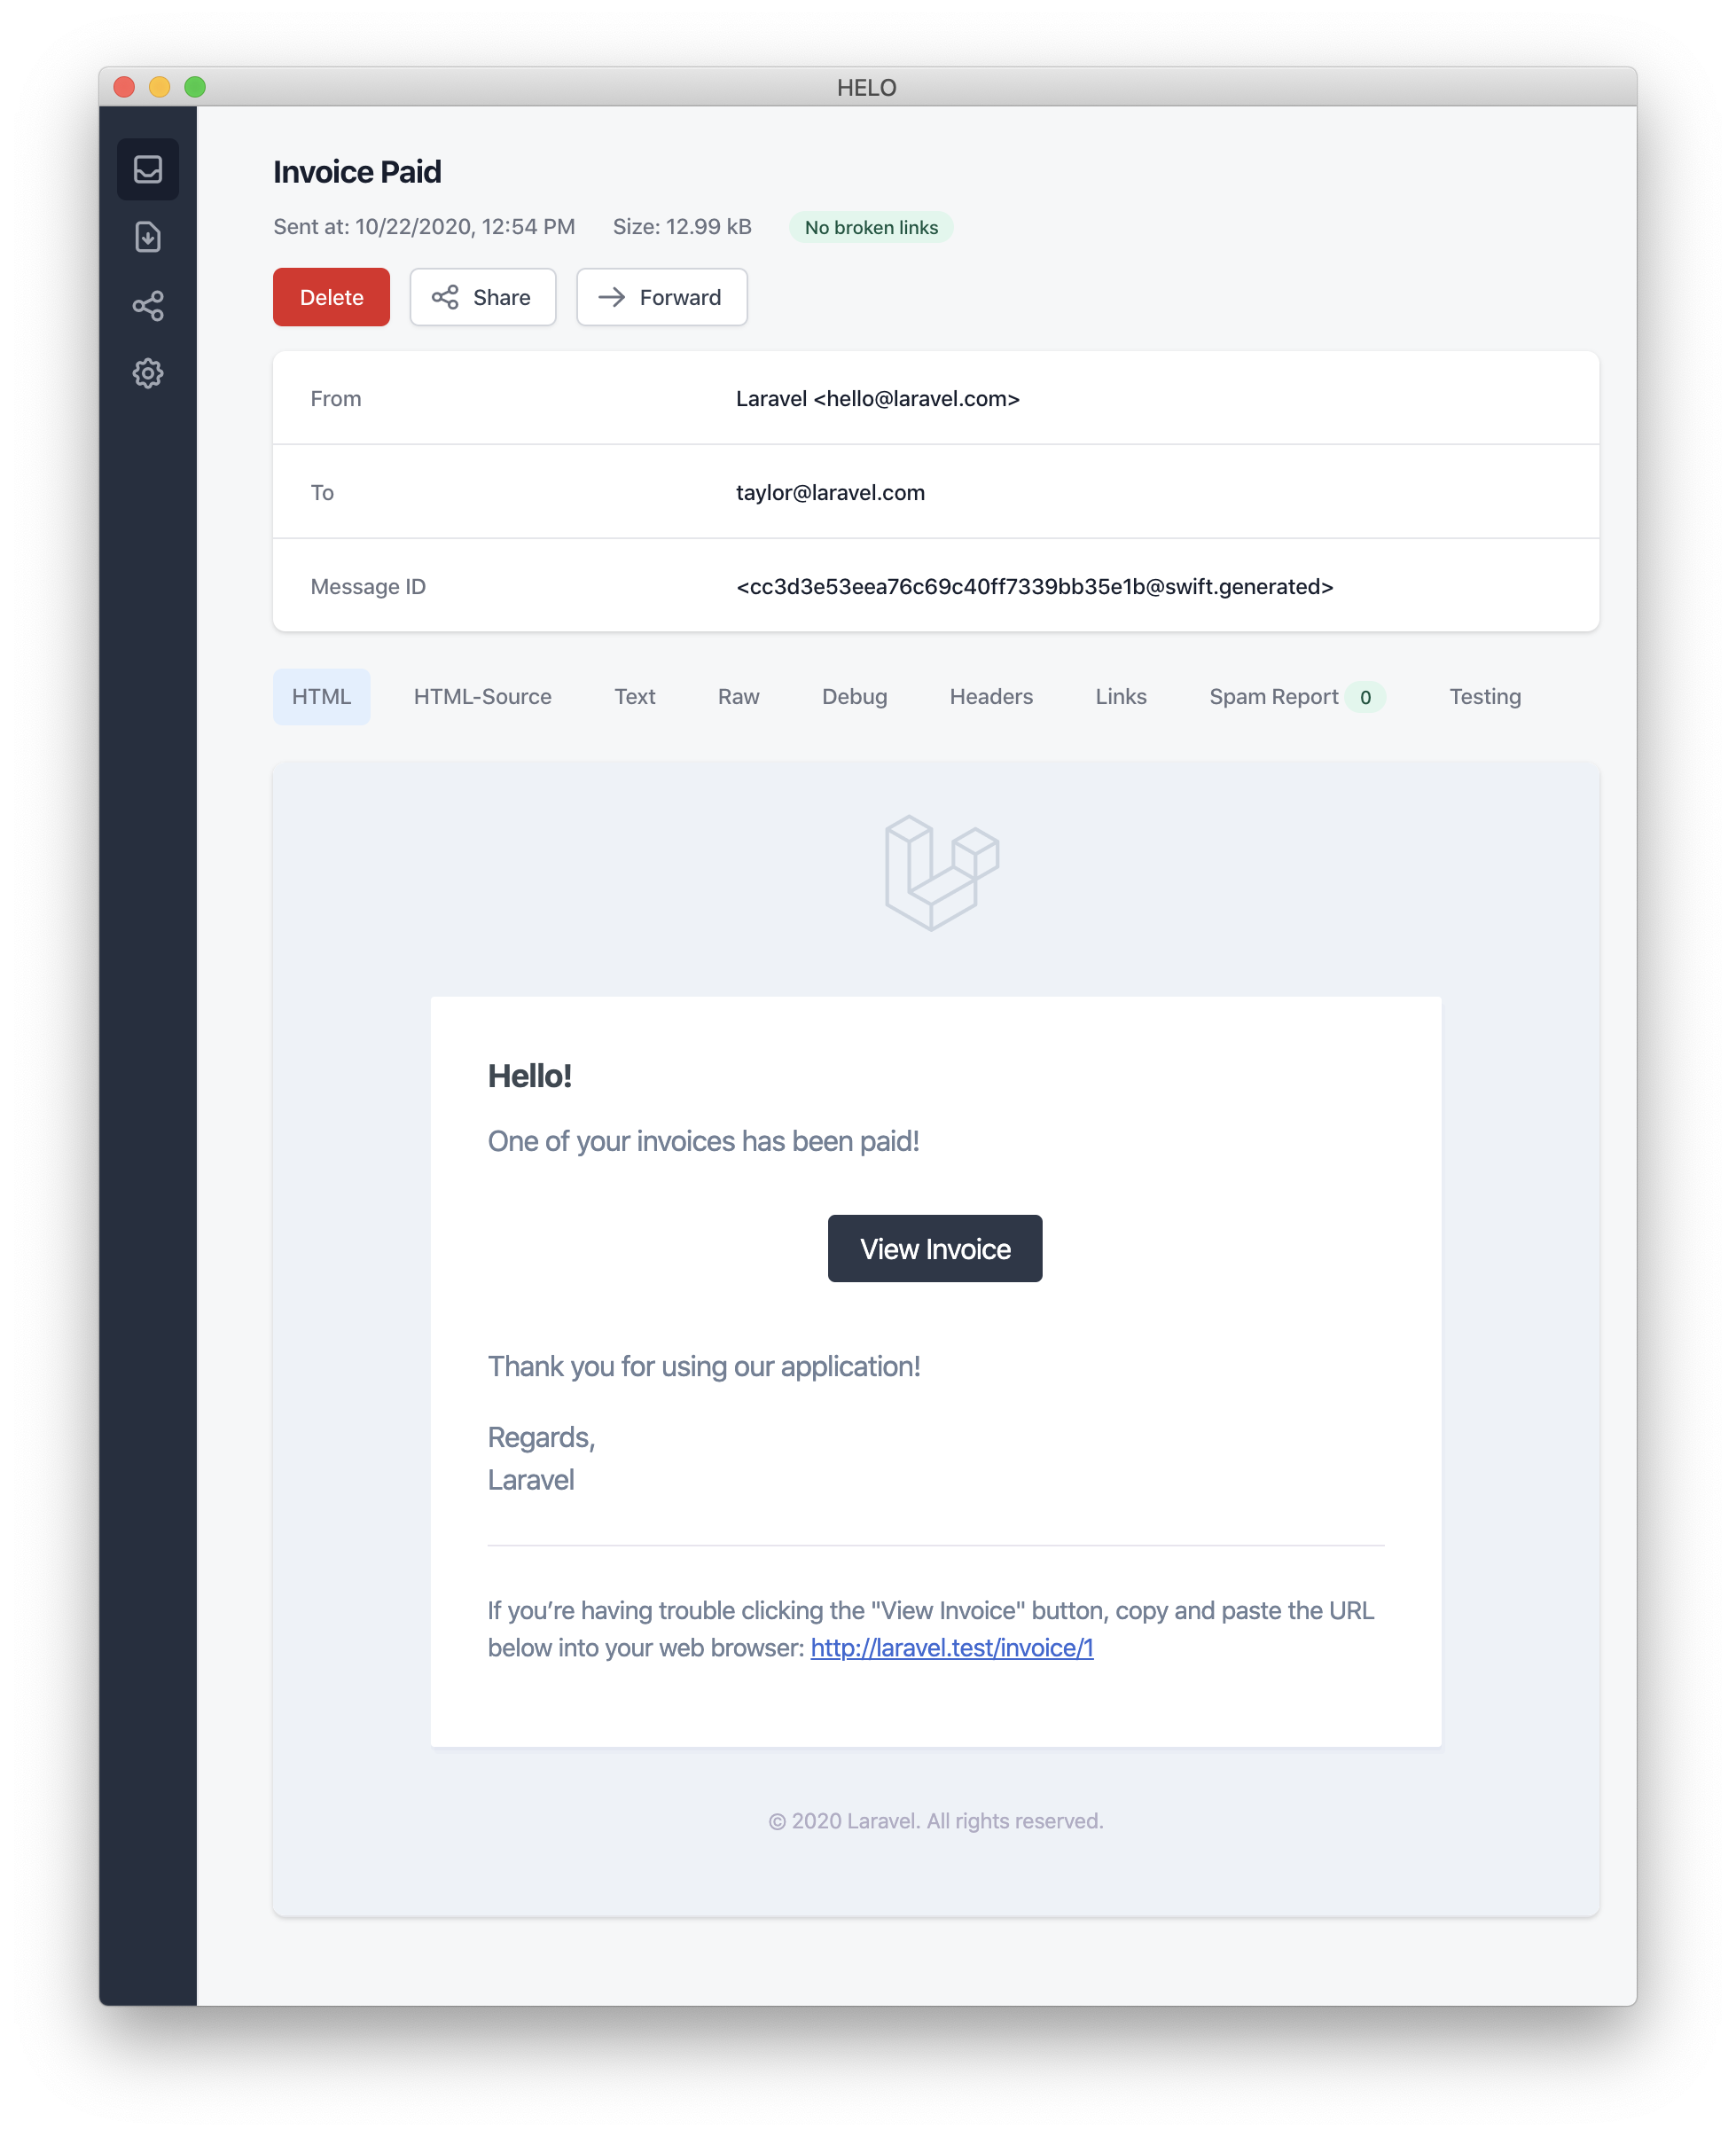
在此示例中,我们注册了一个问候语、一行文本、一项行动呼吁,然后是另一行文本。MailMessage 对象提供的方法使得格式化小型事务性电子邮件变得简单而快速。邮件渠道随后会将消息组件转换为一个美观、响应式的 HTML 电子邮件模板,并附带一个纯文本副本。以下是 mail 渠道生成的电子邮件示例:
NOTE
在发送邮件通知时,请确保在 config/app.php 配置文件中设置 name 配置选项。此值将在邮件通知消息的页眉和页脚中使用。
错误消息
某些通知会通知用户错误,例如发票支付失败。您可以通过在构建消息时调用 error 方法来指示邮件消息与错误有关。在邮件消息上使用 error 方法时,行动呼吁按钮将是红色而不是黑色:
/**
 * 获取通知的邮件表示。
 *
 * @param  mixed  $notifiable
 * @return \Illuminate\Notifications\Messages\MailMessage
 */
public function toMail($notifiable)
{
    return (new MailMessage)
                ->error()
                ->subject('Invoice Payment Failed')
                ->line('...');
}其他邮件通知格式化选项
您可以使用 view 方法指定一个自定义模板来渲染通知电子邮件,而不是在通知类中定义文本“行”:
/**
 * 获取通知的邮件表示。
 *
 * @param  mixed  $notifiable
 * @return \Illuminate\Notifications\Messages\MailMessage
 */
public function toMail($notifiable)
{
    return (new MailMessage)->view(
        'emails.name', ['invoice' => $this->invoice]
    );
}您可以通过将视图名称作为数组的第二个元素传递给 view 方法来为邮件消息指定一个纯文本视图:
/**
 * 获取通知的邮件表示。
 *
 * @param  mixed  $notifiable
 * @return \Illuminate\Notifications\Messages\MailMessage
 */
public function toMail($notifiable)
{
    return (new MailMessage)->view(
        ['emails.name.html', 'emails.name.plain'],
        ['invoice' => $this->invoice]
    );
}自定义发件人
默认情况下,电子邮件的发件人/发件地址在 config/mail.php 配置文件中定义。但是,您可以使用 from 方法为特定通知指定发件地址:
/**
 * 获取通知的邮件表示。
 *
 * @param  mixed  $notifiable
 * @return \Illuminate\Notifications\Messages\MailMessage
 */
public function toMail($notifiable)
{
    return (new MailMessage)
                ->from('barrett@example.com', 'Barrett Blair')
                ->line('...');
}自定义收件人
通过 mail 渠道发送通知时,通知系统会自动查找可通知实体上的 email 属性。您可以通过在可通知实体上定义一个 routeNotificationForMail 方法来自定义用于发送通知的电子邮件地址:
<?php

namespace App\Models;

use Illuminate\Foundation\Auth\User as Authenticatable;
use Illuminate\Notifications\Notifiable;

class User extends Authenticatable
{
    use Notifiable;

    /**
     * 为邮件渠道路由通知。
     *
     * @param  \Illuminate\Notifications\Notification  $notification
     * @return array|string
     */
    public function routeNotificationForMail($notification)
    {
        // 仅返回电子邮件地址...
        return $this->email_address;

        // 返回电子邮件地址和姓名...
        return [$this->email_address => $this->name];
    }
}自定义主题
默认情况下,电子邮件的主题是通知类名称格式化为“标题大小写”。因此,如果您的通知类名为 InvoicePaid,则电子邮件的主题将为 Invoice Paid。如果您想为消息指定不同的主题,可以在构建消息时调用 subject 方法:
/**
 * 获取通知的邮件表示。
 *
 * @param  mixed  $notifiable
 * @return \Illuminate\Notifications\Messages\MailMessage
 */
public function toMail($notifiable)
{
    return (new MailMessage)
                ->subject('Notification Subject')
                ->line('...');
}自定义邮件程序
默认情况下,电子邮件通知将使用 config/mail.php 配置文件中定义的默认邮件程序发送。但是,您可以在运行时通过在构建消息时调用 mailer 方法来指定不同的邮件程序:
/**
 * 获取通知的邮件表示。
 *
 * @param  mixed  $notifiable
 * @return \Illuminate\Notifications\Messages\MailMessage
 */
public function toMail($notifiable)
{
    return (new MailMessage)
                ->mailer('postmark')
                ->line('...');
}自定义模板
您可以通过发布通知包的资源来修改邮件通知使用的 HTML 和纯文本模板。运行此命令后,邮件通知模板将位于 resources/views/vendor/notifications 目录中:
php artisan vendor:publish --tag=laravel-notifications附件
要向电子邮件通知添加附件,请在构建消息时使用 attach 方法。attach 方法接受文件的绝对路径作为其第一个参数:
/**
 * 获取通知的邮件表示。
 *
 * @param  mixed  $notifiable
 * @return \Illuminate\Notifications\Messages\MailMessage
 */
public function toMail($notifiable)
{
    return (new MailMessage)
                ->greeting('Hello!')
                ->attach('/path/to/file');
}在将文件附加到消息时,您还可以通过将 array 作为第二个参数传递给 attach 方法来指定显示名称和/或 MIME 类型:
/**
 * 获取通知的邮件表示。
 *
 * @param  mixed  $notifiable
 * @return \Illuminate\Notifications\Messages\MailMessage
 */
public function toMail($notifiable)
{
    return (new MailMessage)
                ->greeting('Hello!')
                ->attach('/path/to/file', [
                    'as' => 'name.pdf',
                    'mime' => 'application/pdf',
                ]);
}与在邮件对象中附加文件不同,您不能直接从存储磁盘使用 attachFromStorage 附加文件。您应该使用 attach 方法,并提供文件在存储磁盘上的绝对路径。或者,您可以从 toMail 方法返回一个mailable:
use App\Mail\InvoicePaid as InvoicePaidMailable;

/**
 * 获取通知的邮件表示。
 *
 * @param  mixed  $notifiable
 * @return Mailable
 */
public function toMail($notifiable)
{
    return (new InvoicePaidMailable($this->invoice))
                ->to($notifiable->email)
                ->attachFromStorage('/path/to/file');
}在必要时,可以使用 attachMany 方法将多个文件附加到消息中:
/**
 * 获取通知的邮件表示。
 *
 * @param  mixed  $notifiable
 * @return \Illuminate\Notifications\Messages\MailMessage
 */
public function toMail($notifiable)
{
    return (new MailMessage)
                ->greeting('Hello!')
                ->attachMany([
                    '/path/to/forge.svg',
                    '/path/to/vapor.svg' => [
                        'as' => 'Logo.svg',
                        'mime' => 'image/svg+xml',
                    ],
                ]);
}原始数据附件
attachData 方法可用于将原始字节字符串作为附件附加。在调用 attachData 方法时,您应提供应分配给附件的文件名:
/**
 * 获取通知的邮件表示。
 *
 * @param  mixed  $notifiable
 * @return \Illuminate\Notifications\Messages\MailMessage
 */
public function toMail($notifiable)
{
    return (new MailMessage)
                ->greeting('Hello!')
                ->attachData($this->pdf, 'name.pdf', [
                    'mime' => 'application/pdf',
                ]);
}添加标签和元数据
某些第三方电子邮件提供商(如 Mailgun 和 Postmark)支持消息“标签”和“元数据”,可用于分组和跟踪应用程序发送的电子邮件。您可以通过 tag 和 metadata 方法向电子邮件消息添加标签和元数据:
/**
 * 获取通知的邮件表示。
 *
 * @param  mixed  $notifiable
 * @return \Illuminate\Notifications\Messages\MailMessage
 */
public function toMail($notifiable)
{
    return (new MailMessage)
                ->greeting('Comment Upvoted!')
                ->tag('upvote')
                ->metadata('comment_id', $this->comment->id);
}如果您的应用程序使用 Mailgun 驱动程序,您可以查阅 Mailgun 的文档以获取有关标签和元数据的更多信息。同样,Postmark 文档也可以查阅以获取有关其对标签和元数据的支持的更多信息。
如果您的应用程序使用 Amazon SES 发送电子邮件,您应该使用 metadata 方法将 SES“标签”附加到消息中。
自定义 Symfony 消息
MailMessage 类的 withSymfonyMessage 方法允许您注册一个闭包,该闭包将在发送消息之前使用 Symfony Message 实例调用。这使您有机会在消息发送之前对其进行深度自定义:
use Symfony\Component\Mime\Email;

/**
 * 获取通知的邮件表示。
 *
 * @param  mixed  $notifiable
 * @return \Illuminate\Notifications\Messages\MailMessage
 */
public function toMail($notifiable)
{
    return (new MailMessage)
                ->withSymfonyMessage(function (Email $message) {
                    $message->getHeaders()->addTextHeader(
                        'Custom-Header', 'Header Value'
                    );
                });
}使用 Mailables
如果需要,您可以从通知的 toMail 方法返回一个完整的mailable 对象。当返回 Mailable 而不是 MailMessage 时,您需要使用 mailable 对象的 to 方法指定消息接收者:
use App\Mail\InvoicePaid as InvoicePaidMailable;

/**
 * 获取通知的邮件表示。
 *
 * @param  mixed  $notifiable
 * @return Mailable
 */
public function toMail($notifiable)
{
    return (new InvoicePaidMailable($this->invoice))
                ->to($notifiable->email);
}Mailables 和按需通知
如果您正在发送按需通知,传递给 toMail 方法的 $notifiable 实例将是 Illuminate\Notifications\AnonymousNotifiable 的实例,该实例提供了一个 routeNotificationFor 方法,可用于检索按需通知应发送到的电子邮件地址:
use App\Mail\InvoicePaid as InvoicePaidMailable;
use Illuminate\Notifications\AnonymousNotifiable;

/**
 * 获取通知的邮件表示。
 *
 * @param  mixed  $notifiable
 * @return Mailable
 */
public function toMail($notifiable)
{
    $address = $notifiable instanceof AnonymousNotifiable
            ? $notifiable->routeNotificationFor('mail')
            : $notifiable->email;

    return (new InvoicePaidMailable($this->invoice))
                ->to($address);
}预览邮件通知
在设计邮件通知模板时,可以方便地在浏览器中快速预览渲染的邮件消息,就像典型的 Blade 模板一样。为此,Laravel 允许您直接从路由闭包或控制器返回邮件通知生成的任何邮件消息。当返回 MailMessage 时,它将被渲染并显示在浏览器中,使您能够快速预览其设计,而无需将其发送到实际的电子邮件地址:
use App\Models\Invoice;
use App\Notifications\InvoicePaid;

Route::get('/notification', function () {
    $invoice = Invoice::find(1);

    return (new InvoicePaid($invoice))
                ->toMail($invoice->user);
});Markdown 邮件通知
Markdown 邮件通知允许您利用邮件通知的预构建模板,同时为您提供更多自由来撰写更长的自定义消息。由于消息是用 Markdown 编写的,Laravel 能够为消息渲染美观、响应式的 HTML 模板,同时自动生成纯文本副本。
生成消息
要生成带有相应 Markdown 模板的通知,您可以使用 make:notification Artisan 命令的 --markdown 选项:
php artisan make:notification InvoicePaid --markdown=mail.invoice.paid与所有其他邮件通知一样,使用 Markdown 模板的通知应在其通知类上定义一个 toMail 方法。然而,您应该使用 markdown 方法来指定应使用的 Markdown 模板的名称,而不是使用 line 和 action 方法来构建通知。可以将您希望提供给模板的数据数组作为方法的第二个参数传递:
/**
 * 获取通知的邮件表示。
 *
 * @param  mixed  $notifiable
 * @return \Illuminate\Notifications\Messages\MailMessage
 */
public function toMail($notifiable)
{
    $url = url('/invoice/'.$this->invoice->id);

    return (new MailMessage)
                ->subject('Invoice Paid')
                ->markdown('mail.invoice.paid', ['url' => $url]);
}撰写消息
Markdown 邮件通知使用 Blade 组件和 Markdown 语法的组合,使您能够轻松构建通知,同时利用 Laravel 的预制通知组件:
<x-mail::message>
# Invoice Paid

Your invoice has been paid!

<x-mail::button :url="$url">
View Invoice
</x-mail::button>

Thanks,<br>
{{ config('app.name') }}
</x-mail::message>按钮组件
按钮组件渲染一个居中的按钮链接。该组件接受两个参数,一个 url 和一个可选的 color。支持的颜色有 primary、green 和 red。您可以根据需要向通知添加任意数量的按钮组件:
<x-mail::button :url="$url" color="green">
View Invoice
</x-mail::button>面板组件
面板组件将给定的文本块渲染在一个背景颜色与通知其余部分略有不同的面板中。这使您能够引起对给定文本块的注意:
<x-mail::panel>
This is the panel content.
</x-mail::panel>表格组件
表格组件允许您将 Markdown 表格转换为 HTML 表格。该组件接受 Markdown 表格作为其内容。表格列对齐支持使用默认的 Markdown 表格对齐语法:
<x-mail::table>
| Laravel       | Table         | Example  |
| ------------- |:-------------:| --------:|
| Col 2 is      | Centered      | $10      |
| Col 3 is      | Right-Aligned | $20      |
</x-mail::table>自定义组件
您可以将所有 Markdown 通知组件导出到您自己的应用程序中进行自定义。要导出组件,请使用 vendor:publish Artisan 命令发布 laravel-mail 资源标签:
php artisan vendor:publish --tag=laravel-mail此命令将 Markdown 邮件组件发布到 resources/views/vendor/mail 目录中。mail 目录将包含一个 html 和一个 text 目录,每个目录都包含其各自的可用组件表示。您可以根据需要自定义这些组件。
自定义 CSS
导出组件后,resources/views/vendor/mail/html/themes 目录将包含一个 default.css 文件。您可以自定义此文件中的 CSS,您的样式将自动内联到 Markdown 通知的 HTML 表示中。
如果您想为 Laravel 的 Markdown 组件构建一个全新的主题,可以在 html/themes 目录中放置一个 CSS 文件。在命名并保存您的 CSS 文件后,更新 mail 配置文件的 theme 选项以匹配新主题的名称。
要为单个通知自定义主题,可以在构建通知的邮件消息时调用 theme 方法。theme 方法接受发送通知时应使用的主题名称:
/**
 * 获取通知的邮件表示。
 *
 * @param  mixed  $notifiable
 * @return \Illuminate\Notifications\Messages\MailMessage
 */
public function toMail($notifiable)
{
    return (new MailMessage)
                ->theme('invoice')
                ->subject('Invoice Paid')
                ->markdown('mail.invoice.paid', ['url' => $url]);
}数据库通知
先决条件
database 通知渠道将通知信息存储在数据库表中。此表将包含通知类型以及描述通知的 JSON 数据结构。
您可以查询该表以在应用程序的用户界面中显示通知。但是,在此之前,您需要创建一个数据库表来保存通知。您可以使用 notifications:table 命令生成一个具有正确表模式的迁移:
php artisan notifications:table

php artisan migrate格式化数据库通知
如果通知支持存储在数据库表中,您应该在通知类上定义一个 toDatabase 或 toArray 方法。此方法将接收一个 $notifiable 实体,并应返回一个简单的 PHP 数组。返回的数组将被编码为 JSON 并存储在 notifications 表的 data 列中。让我们来看一个 toArray 方法的示例:
/**
 * 获取通知的数组表示。
 *
 * @param  mixed  $notifiable
 * @return array
 */
public function toArray($notifiable)
{
    return [
        'invoice_id' => $this->invoice->id,
        'amount' => $this->invoice->amount,
    ];
}toDatabase 与 toArray
toArray 方法也被 broadcast 渠道用于确定要广播到 JavaScript 前端的数据。如果您希望为 database 和 broadcast 渠道提供两个不同的数组表示,您应该定义一个 toDatabase 方法而不是 toArray 方法。
访问通知
一旦通知存储在数据库中,您需要一种方便的方法从可通知实体中访问它们。Illuminate\Notifications\Notifiable trait(包含在 Laravel 的默认 App\Models\User 模型中)包括一个 notifications Eloquent 关系,返回实体的通知。要获取通知,您可以像访问任何其他 Eloquent 关系一样访问此方法。默认情况下,通知将按 created_at 时间戳排序,最新的通知位于集合的开头:
$user = App\Models\User::find(1);

foreach ($user->notifications as $notification) {
    echo $notification->type;
}如果您只想检索“未读”通知,可以使用 unreadNotifications 关系。同样,这些通知将按 created_at 时间戳排序,最新的通知位于集合的开头:
$user = App\Models\User::find(1);

foreach ($user->unreadNotifications as $notification) {
    echo $notification->type;
}NOTE
要从 JavaScript 客户端访问通知,您应该为应用程序定义一个通知控制器,该控制器返回可通知实体(如当前用户)的通知。然后,您可以从 JavaScript 客户端向该控制器的 URL 发起 HTTP 请求。
标记通知为已读
通常,当用户查看通知时,您会希望将其标记为“已读”。Illuminate\Notifications\Notifiable trait 提供了一个 markAsRead 方法,该方法会更新通知数据库记录的 read_at 列:
$user = App\Models\User::find(1);

foreach ($user->unreadNotifications as $notification) {
    $notification->markAsRead();
}但是,您可以直接在通知集合上使用 markAsRead 方法,而不是遍历每个通知:
$user->unreadNotifications->markAsRead();您还可以使用批量更新查询将所有通知标记为已读,而无需从数据库中检索它们:
$user = App\Models\User::find(1);

$user->unreadNotifications()->update(['read_at' => now()]);您可以 delete 通知以将其从表中完全删除:
$user->notifications()->delete();广播通知
先决条件
在广播通知之前,您应该配置并熟悉 Laravel 的事件广播服务。事件广播提供了一种从 JavaScript 前端响应服务器端 Laravel 事件的方法。
格式化广播通知
broadcast 渠道使用 Laravel 的事件广播服务广播通知,允许您的 JavaScript 前端实时捕获通知。如果通知支持广播,您可以在通知类上定义一个 toBroadcast 方法。此方法将接收一个 $notifiable 实体,并应返回一个 BroadcastMessage 实例。如果 toBroadcast 方法不存在,将使用 toArray 方法来收集应广播的数据。返回的数据将被编码为 JSON 并广播到您的 JavaScript 前端。让我们来看一个 toBroadcast 方法的示例:
use Illuminate\Notifications\Messages\BroadcastMessage;

/**
 * 获取通知的广播表示。
 *
 * @param  mixed  $notifiable
 * @return BroadcastMessage
 */
public function toBroadcast($notifiable)
{
    return new BroadcastMessage([
        'invoice_id' => $this->invoice->id,
        'amount' => $this->invoice->amount,
    ]);
}广播队列配置
所有广播通知都被排队等待广播。如果您想配置用于排队广播操作的队列连接或队列名称,可以使用 BroadcastMessage 的 onConnection 和 onQueue 方法:
return (new BroadcastMessage($data))
                ->onConnection('sqs')
->onQueue('broadcasts');自定义通知类型
除了您指定的数据,所有广播通知还具有一个 type 字段,包含通知的完整类名。如果您想自定义通知 type,可以在通知类上定义一个 broadcastType 方法:
use Illuminate\Notifications\Messages\BroadcastMessage;

/**
 * 获取正在广播的通知的类型。
 *
 * @return string
 */
public function broadcastType()
{
    return 'broadcast.message';
}监听通知
通知将在使用 {notifiable}.{id} 约定格式化的私有频道上广播。因此,如果您正在向 ID 为 1 的 App\Models\User 实例发送通知,通知将广播在 App.Models.User.1 私有频道上。使用 Laravel Echo 时,您可以使用 notification 方法轻松地在频道上监听通知:
Echo.private('App.Models.User.' + userId)
    .notification((notification) => {
        console.log(notification.type);
});自定义通知频道
如果您想自定义实体的广播通知所广播的频道,可以在可通知实体上定义一个 receivesBroadcastNotificationsOn 方法:
<?php

namespace App\Models;

use Illuminate\Broadcasting\PrivateChannel;
use Illuminate\Foundation\Auth\User as Authenticatable;
use Illuminate\Notifications\Notifiable;

class User extends Authenticatable
{
    use Notifiable;

    /**
     * 用户接收通知广播的频道。
     *
     * @return string
     */
    public function receivesBroadcastNotificationsOn()
    {
        return 'users.'.$this->id;
    }
}短信通知
先决条件
在 Laravel 中发送短信通知由 Vonage(以前称为 Nexmo)提供支持。在您可以通过 Vonage 发送通知之前,您需要安装 laravel/vonage-notification-channel 和 guzzlehttp/guzzle 包:
composer require laravel/vonage-notification-channel guzzlehttp/guzzle该包包括一个 配置文件。但是,您不需要将此配置文件导出到您自己的应用程序。您可以简单地使用 VONAGE_KEY 和 VONAGE_SECRET 环境变量来定义您的 Vonage 公钥和密钥。
定义密钥后,您应该设置一个 VONAGE_SMS_FROM 环境变量,定义您的短信消息默认发送的电话号码。您可以在 Vonage 控制面板中生成此电话号码:
VONAGE_SMS_FROM=15556666666格式化短信通知
如果通知支持以短信形式发送,您应该在通知类上定义一个 toVonage 方法。此方法将接收一个 $notifiable 实体,并应返回一个 Illuminate\Notifications\Messages\VonageMessage 实例:
/**
 * 获取通知的 Vonage / 短信表示。
 *
 * @param  mixed  $notifiable
 * @return \Illuminate\Notifications\Messages\VonageMessage
 */
public function toVonage($notifiable)
{
    return (new VonageMessage)
                ->content('您的短信消息内容');
}Unicode 内容
如果您的短信消息将包含 Unicode 字符,您应该在构建 VonageMessage 实例时调用 unicode 方法:
/**
 * 获取通知的 Vonage / 短信表示。
 *
 * @param  mixed  $notifiable
 * @return \Illuminate\Notifications\Messages\VonageMessage
 */
public function toVonage($notifiable)
{
    return (new VonageMessage)
                ->content('您的 Unicode 消息')
                ->unicode();
}自定义“发件人”号码
如果您想从与 VONAGE_SMS_FROM 环境变量指定的电话号码不同的号码发送某些通知,您可以在 VonageMessage 实例上调用 from 方法:
/**
 * 获取通知的 Vonage / 短信表示。
 *
 * @param  mixed  $notifiable
 * @return \Illuminate\Notifications\Messages\VonageMessage
 */
public function toVonage($notifiable)
{
    return (new VonageMessage)
                ->content('您的短信消息内容')
                ->from('15554443333');
}添加客户参考
如果您想跟踪每个用户、团队或客户的费用,您可以向通知添加“客户参考”。Vonage 将允许您使用此客户参考生成报告,以便更好地了解特定客户的短信使用情况。客户参考可以是任何最多 40 个字符的字符串:
/**
 * 获取通知的 Vonage / 短信表示。
 *
 * @param  mixed  $notifiable
 * @return \Illuminate\Notifications\Messages\VonageMessage
 */
public function toVonage($notifiable)
{
    return (new VonageMessage)
                ->clientReference((string) $notifiable->id)
                ->content('您的短信消息内容');
}路由短信通知
要将 Vonage 通知路由到正确的电话号码,请在您的可通知实体上定义一个 routeNotificationForVonage 方法:
<?php

namespace App\Models;

use Illuminate\Foundation\Auth\User as Authenticatable;
use Illuminate\Notifications\Notifiable;

class User extends Authenticatable
{
    use Notifiable;

    /**
     * 为 Vonage 频道路由通知。
     *
     * @param  \Illuminate\Notifications\Notification  $notification
     * @return string
     */
    public function routeNotificationForVonage($notification)
    {
        return $this->phone_number;
    }
}Slack 通知
先决条件
在您可以通过 Slack 发送通知之前,您必须通过 Composer 安装 Slack 通知频道:
composer require laravel/slack-notification-channel您还需要为您的团队创建一个 Slack 应用。创建应用后,您应该为工作区配置一个“传入 Webhook”。Slack 将为您提供一个 Webhook URL,您可以在 路由 Slack 通知 时使用。
格式化 Slack 通知
如果通知支持以 Slack 消息形式发送,您应该在通知类上定义一个 toSlack 方法。此方法将接收一个 $notifiable 实体,并应返回一个 Illuminate\Notifications\Messages\SlackMessage 实例。Slack 消息可以包含文本内容以及格式化附加文本或字段数组的“附件”。让我们看看一个基本的 toSlack 示例:
/**
 * 获取通知的 Slack 表示。
 *
 * @param  mixed  $notifiable
 * @return \Illuminate\Notifications\Messages\SlackMessage
 */
public function toSlack($notifiable)
{
    return (new SlackMessage)
                ->content('您的发票之一已支付!');
}Slack 附件
您还可以向 Slack 消息添加“附件”。附件提供比简单文本消息更丰富的格式选项。在此示例中,我们将发送有关应用程序中发生的异常的错误通知,包括查看异常详细信息的链接:
/**
 * 获取通知的 Slack 表示。
 *
 * @param  mixed  $notifiable
 * @return \Illuminate\Notifications\Messages\SlackMessage
 */
public function toSlack($notifiable)
{
    $url = url('/exceptions/'.$this->exception->id);

    return (new SlackMessage)
                ->error()
                ->content('哎呀!出了点问题。')
                ->attachment(function ($attachment) use ($url) {
                    $attachment->title('异常:文件未找到', $url)
                               ->content('文件 [background.jpg] 未找到。');
                });
}附件还允许您指定应呈现给用户的数据数组。给定的数据将以表格样式格式呈现,以便于阅读:
/**
 * 获取通知的 Slack 表示。
 *
 * @param  mixed  $notifiable
 * @return SlackMessage
 */
public function toSlack($notifiable)
{
    $url = url('/invoices/'.$this->invoice->id);

    return (new SlackMessage)
                ->success()
                ->content('您的发票之一已支付!')
                ->attachment(function ($attachment) use ($url) {
                    $attachment->title('发票 1322', $url)
                               ->fields([
                                    '标题' => '服务器费用',
                                    '金额' => '$1,234',
                                    '通过' => '美国运通',
                                    '是否逾期' => ':-1:',
                                ]);
                });
}Markdown 附件内容
如果您的某些附件字段包含 Markdown,您可以使用 markdown 方法指示 Slack 解析并显示给定的附件字段为 Markdown 格式的文本。此方法接受的值为:pretext、text 和 / 或 fields。有关 Slack 附件格式的更多信息,请查看 Slack API 文档:
/**
 * 获取通知的 Slack 表示。
 *
 * @param  mixed  $notifiable
 * @return SlackMessage
 */
public function toSlack($notifiable)
{
    $url = url('/exceptions/'.$this->exception->id);

    return (new SlackMessage)
                ->error()
                ->content('哎呀!出了点问题。')
                ->attachment(function ($attachment) use ($url) {
                    $attachment->title('异常:文件未找到', $url)
                               ->content('文件 [background.jpg] 未找到。')
                               ->markdown(['text']);
                });
}路由 Slack 通知
要将 Slack 通知路由到正确的 Slack 团队和频道,请在您的可通知实体上定义一个 routeNotificationForSlack 方法。此方法应返回通知应传递到的 Webhook URL。Webhook URL 可以通过向您的 Slack 团队添加“传入 Webhook”服务生成:
<?php

namespace App\Models;

use Illuminate\Foundation\Auth\User as Authenticatable;
use Illuminate\Notifications\Notifiable;

class User extends Authenticatable
{
    use Notifiable;

    /**
     * 为 Slack 频道路由通知。
     *
     * @param  \Illuminate\Notifications\Notification  $notification
     * @return string
     */
    public function routeNotificationForSlack($notification)
    {
        return 'https://hooks.slack.com/services/...';
    }
}本地化通知
Laravel 允许您以 HTTP 请求的当前语言环境以外的语言环境发送通知,并且即使通知被排队,也会记住此语言环境。
为此,Illuminate\Notifications\Notification 类提供了一个 locale 方法来设置所需的语言。应用程序将在评估通知时切换到此语言环境,然后在评估完成后恢复到先前的语言环境:
$user->notify((new InvoicePaid($invoice))->locale('es'));通过 Notification facade 也可以实现多个可通知条目的本地化:
Notification::locale('es')->send(
    $users, new InvoicePaid($invoice)
);用户首选语言环境
有时,应用程序会存储每个用户的首选语言环境。通过在您的可通知模型上实现 HasLocalePreference 合约,您可以指示 Laravel 在发送通知时使用此存储的语言环境:
use Illuminate\Contracts\Translation\HasLocalePreference;

class User extends Model implements HasLocalePreference
{
    /**
     * 获取用户的首选语言环境。
     *
     * @return string
     */
    public function preferredLocale()
    {
        return $this->locale;
    }
}一旦您实现了该接口,Laravel 将自动在向模型发送通知和邮件时使用首选语言环境。因此,在使用此接口时无需调用 locale 方法:
$user->notify(new InvoicePaid($invoice));通知事件
通知发送事件
当通知正在发送时,通知系统会调度 Illuminate\Notifications\Events\NotificationSending 事件。这包含“可通知”实体和通知实例本身。您可以在应用程序的 EventServiceProvider 中注册此事件的监听器:
use App\Listeners\CheckNotificationStatus;
use Illuminate\Notifications\Events\NotificationSending;

/**
 * 应用程序的事件监听器映射。
 *
 * @var array
 */
protected $listen = [
    NotificationSending::class => [
        CheckNotificationStatus::class,
    ],
];如果 NotificationSending 事件的事件监听器返回 false,则不会发送通知:
use Illuminate\Notifications\Events\NotificationSending;

/**
 * 处理事件。
 *
 * @param  \Illuminate\Notifications\Events\NotificationSending  $event
 * @return void
 */
public function handle(NotificationSending $event)
{
    return false;
}在事件监听器中,您可以访问事件上的 notifiable、notification 和 channel 属性,以了解有关通知接收者或通知本身的更多信息:
/**
 * 处理事件。
 *
 * @param  \Illuminate\Notifications\Events\NotificationSending  $event
 * @return void
 */
public function handle(NotificationSending $event)
{
    // $event->channel
    // $event->notifiable
    // $event->notification
}通知发送事件
当通知被发送时,通知系统会调度 Illuminate\Notifications\Events\NotificationSent 事件。这包含“可通知”实体和通知实例本身。您可以在应用程序的 EventServiceProvider 中注册此事件的监听器:
use App\Listeners\LogNotification;
use Illuminate\Notifications\Events\NotificationSent;

/**
 * 应用程序的事件监听器映射。
 *
 * @var array
 */
protected $listen = [
    NotificationSent::class => [
        LogNotification::class,
    ],
];NOTE
在 EventServiceProvider 中注册监听器后,使用 event:generate Artisan 命令快速生成监听器类。
在事件监听器中,您可以访问事件上的 notifiable、notification、channel 和 response 属性,以了解有关通知接收者或通知本身的更多信息:
/**
 * 处理事件。
 *
 * @param  \Illuminate\Notifications\Events\NotificationSent  $event
 * @return void
 */
public function handle(NotificationSent $event)
{
    // $event->channel
    // $event->notifiable
    // $event->notification
    // $event->response
}自定义频道
Laravel 附带了一些通知频道,但您可能希望编写自己的驱动程序通过其他频道发送通知。Laravel 使其变得简单。要开始,请定义一个包含 send 方法的类。该方法应接收两个参数:$notifiable 和 $notification。
在 send 方法中,您可以调用通知上的方法以检索您的频道理解的消息对象,然后以您希望的方式将通知发送到 $notifiable 实例:
<?php

namespace App\Notifications;

use Illuminate\Notifications\Notification;

class VoiceChannel
{
    /**
     * 发送给定的通知。
     *
     * @param  mixed  $notifiable
     * @param  \Illuminate\Notifications\Notification  $notification
     * @return void
     */
    public function send($notifiable, Notification $notification)
    {
        $message = $notification->toVoice($notifiable);

        // 将通知发送到 $notifiable 实例...
    }
}一旦定义了您的通知频道类,您可以从任何通知的 via 方法返回类名。在此示例中,通知的 toVoice 方法可以返回您选择的任何对象来表示语音消息。例如,您可以定义自己的 VoiceMessage 类来表示这些消息:
<?php

namespace App\Notifications;

use App\Notifications\Messages\VoiceMessage;
use App\Notifications\VoiceChannel;
use Illuminate\Bus\Queueable;
use Illuminate\Contracts\Queue\ShouldQueue;
use Illuminate\Notifications\Notification;

class InvoicePaid extends Notification
{
    use Queueable;

    /**
     * 获取通知频道。
     *
     * @param  mixed  $notifiable
     * @return array|string
     */
    public function via($notifiable)
    {
        return [VoiceChannel::class];
    }

    /**
     * 获取通知的语音表示。
     *
     * @param  mixed  $notifiable
     * @return VoiceMessage
     */
    public function toVoice($notifiable)
    {
        // ...
    }
}